In this section, you will be able to customize the access to the projects added to your account. Convenient functionality allows you to invite users, set their roles, customize them, and control their access levels.
Where do I find the Account Access Management?
-
Click on your name in the upper right corner of the screen.
-
Select Account Access in the drop-down list.
Account Access Management consists of three tabs:
Users
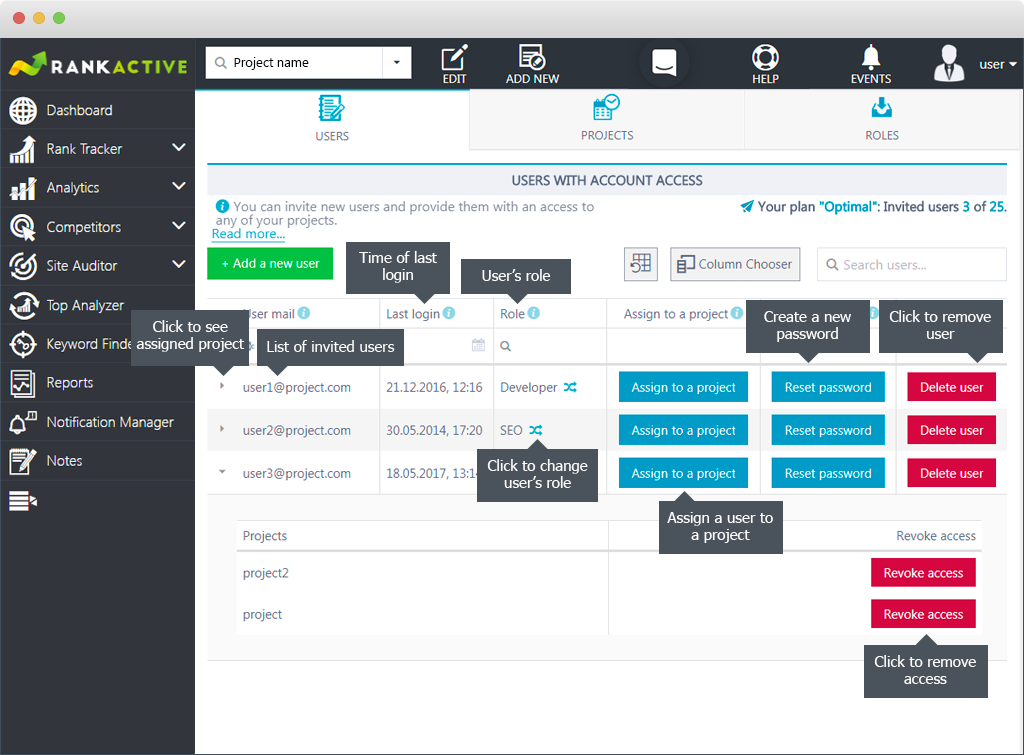
In the Users tab, you can invite new users and provide them with access to any of your projects.
To add a new user, simply click Add a new user, type in their email, choose a project and assign the role. You can find the list of available roles at the Roles tab.
After you completed all the necessary steps, click Add and the invitation will be automatically sent to a new user. Click Cancel If you want to remove the added user.

In the table below you can see the list of invited users and their roles, and check the last login time. You can also assign users to the projects you have under your account, and reset their passwords. By clicking the icon next to the user’s role, you can change the assigned role.
You may remove the access to any of the projects by clicking the arrow next to the user’s email and pushing the Revoke access button.
Projects
At the Projects tab, you can see what users are assigned to your projects and estimate the overall information related to projects.
In addition to that, you can assign users to the existing projects in just a few clicks.
-
Click the Assign users button next to the project.
-
Choose a user from the list.
-
Click Apply.
You can also remove the access to any of the projects by clicking Revoke access next to a user’s name.


Roles
In the Roles section you can check out the list of roles available for your account. There are 4 default roles with immutable settings:
How do I create a new role?
-
Click Add new role while in the Roles tab.
-
Pick a name and description for the new role.
-
Tick the sections and products you want to provide access to.
-
Choose the access level: viewing or/and editing mode.
-
Click Apply to save the new role.
| Administrator | SEO | Developer | Client | |
|---|---|---|---|---|
| Analytics |
|
|
|
|
| Keyword Finder |
|
|
|
|
| Competitors |
|
|
|
|
| Dashboard |
|
|
|
|
| Projects Overview |
|
|
|
|
| Events |
|
|
|
|
| Messages |
|
|
|
|
| Notes |
|
|
|
|
| Notification Manager |
|
|
|
|
| Rank Tracker |
|
|
|
|
| Reports |
|
|
|
|
| Site Auditor |
|
|
|
|
| Top Analyzer |
|
|
|
|
| White Label |
|
|
|
|
Administrator
The Administrator has the full access to the following products and sections: Analytics, Keyword Finder, Competitors, Dashboard, Projects Overview, Events, Messages, Notes, Notification Manager, Rank Tracker, Reports, Site Auditor, Top Analyzer, White Label. Moreover, Administrators are able to see users added to the account.
SEO
SEOs are given full access to Analytics, Competitors, Dashboard, Project Overview, Events, Messages, Notes, Notification Manager, Rank Tracker, Keyword Finder, Reports, Site Auditor, Top Analyzer.
Developer
The developer has full access to Events, Messages, Notes, Site Auditor, and Top Analyzer. They can only view the data for Reports.
Client
Clients are given the full access to Dashboard, Projects Overview, Events, Messages, Notes, Notification Manager. Also, they can view data for Analytics, Rank Tracker and Reports.